
Moonfruit websites (a.k.a. Sitemaker) offer a rich set of very easy to use features for beginners. The built-in blog looks nice and is fully integrated with your site and design but it’s very limited. If you want real blogging power and you want to add WordPress to your moonfruit site, here’s how to do it.
NB: I will use Sitemaker and Moonfruit interchangeably here.
There are several ways you can add third-party widgets and services to moonfruit websites; they each have their pros and cons. Many third-party services offer little HTML snippets that you can simply paste into an HTML widget to get what you want. This works well for small things, YouTube videos and Twitter feeds for example (although there is now a widget for that). However, a blog is far more than a widget and whilst you can do this, it won’t look good or work well. (Technically speaking, they get rendered in an IFrame within the moonfruit HTML page and we don’t want this).
1. Set up an external WordPress Blog
There are two flavours of WordPress blog. You can have them hosted by WordPress or you can host your own. You cannot host your own WordPress blog on moonfruit’s servers, so that option isn’t available to you (unless you have your own server). I’ll assume for this that you already have a moonfruit site but you don’t have a WordPress blog yet. If you already have one, just skip the first few steps; you can use an existing blog with your moonfruit site.
- Create a WordPress account (or log in)
- Create a free WordPress blog (e.g. I created this as gruffdavies.wordpress.com.
(You can start writing blog posts before linking to you moonfruit site if you want to. )
At this stage you should now have a separate moonfruit site and wordpress site. Now we need to link them.
Background information if you’re new to moonfruit: your site will be either on a free moonfruit domain such as gruffiti2.moonfruit.com (the ‘gruffiti2’ site name I’ve used here is a subdomain of moonfruit.com), or you might want to use your own domain name, such as www.gruffdavies.com. You can do this later. Note that your site can use multiple addresses and you set a primary one. This is configured in the admin section of the site editor.
2. Create a link page in Sitemaker
You can manually add links to your WordPress blog anywhere in your site but we want something that feels more integrated and that works with the menu that’s on your Page Master and appears on all pages.
When you create pages in your Sitemaker site, they get added to you menu automatically. You can create a special type of page that isn’t really a page but instead a link to an external site. This is exactly what we want.
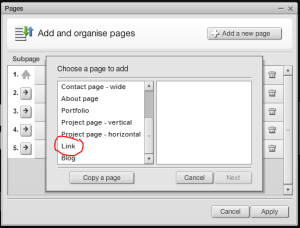
- In the site editor., go to Pages and click ‘add a new page’
- Choose type ‘link’ from the page types offered
- Set the link to be an external link and supply your blog address. Leave the ‘open in new window’ box unchecked if you want a more seamless link to the blog.
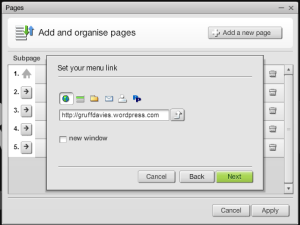
- Choose the page position (where the page will appear in the menu relative to other pages).
- Edit the name of the page to e.g. ‘Blog’ (the default name is the link you supplied which is ugly).


Your menu now has a link to your blog! Yay. At this stage your blog and your site will look nothing like each other. You’ll need to do a little work on making them visually alike (if you want to). However, your blog doesn’t yet link back to your moonfruit site. Let’s do that now.
3. Link your WordPress blog back to you moonfruit site.
WordPress gives you enormous control over look and feel and blog functionality, so there are actually many ways you can set up links back to your main site. I don’t recommend you try too hard to get the blog to look as if it’s part of your site. It’s a lot of work and if the site ever changes you have to do more work to keep them in sync. Instead, make the blog look visually ‘sympathetic’ with your moonfruit site. It’s okay if it’s not exactly the same; it’s a blog. It doesn’t have to have all the same menu options that appear in your moonfruit site. However, you do need it to have one main link back to your site that is obvious, so that a user can seamlessly navigate between the two.
We’re going add a WordPress menu to do this. I’m assuming you haven’t already added one. If you have, you’ll just need to add a link back.
NB: the default WordPress menu is not visible by default on your blog, but it exists. It has two items: a link to the blog itself called ‘Home’, and a link to an ‘About’ page for a bio describing yourself or your blog. We’re going to rename ‘Home’ to ‘Blog’ and we’re going then add a new ‘Home’ link back to your main moonfruit website.
- In your WordPress blog go to Appearance | Menus. The default menu should appear.
- Edit the Home’ menu item (click the little down arrow in the panel on the right) and change the name to ‘Blog’ (or whatever you called your blog menu item in Sitemaker, so that it matches.)
- In the left panel, click Links to open the ‘add link’ section. Enter the details of your moonfruit site address and call that ‘Home’.
- Click add to menu. It will appear under ‘About’
- Drag it to the top position.
- Click ‘save menu’.
Now we need to ensure the menu actually displays in your blog. At the top of the menu page there are two tabs. We’ve been using the edit menu tab. Click ‘Manage Locations’ to control where the menu appears in the blog.
- Under ‘Assigned menu’ if there is no menu selected, choose the menu you’ve edited or created as the Primary Menu. This makes the menu appear on the page.
- Save your changes.
That’s it! Write a test blog post if you don’t have one yet and preview it to make sure you can see the menu and make sure your links between the moonfruit site and your blog work correctly.
All that’s left to do now is bring the site visual styles closer together – if you want to. Choose a sympathetic blog theme and edit it if you want them to be even closer in look and feel. I don’t bother. I think it’s fine for you site and blog to look different, but it depends on your site.
Using a subdomain for better integration
We’ve linked WordPress to a moonfruit site and it works well, but you might be concerned that visitors will notice that it’s really two sites that are linked together – the clue is that the web addresses aren’t the same.
As you can from this blog, you can achieve a more integrated experience by using your own domain name for your moonfruit site (e.g. gruffdavies.com), and configure a subdomain for your blog (e.g. blog.gruffdavies.com).
The instructions for this vary depending on who you buy your domain from.
Just be aware this involves a cost. You have buy a domain, create the subdomain, and you also have to pay for wordpress to map to your subdomain.
You will also need to point the C-record of your subdomain to wordpress.

hi gruff – thanks for this info. just wondering how this affcts seo? if you make your blog a sub-domain does google then index it as part of your site?
LikeLike
Once upon a time, it used to matter; it was better to use a subfolder like /blog, but search engines these days are much smarter than they used to be and it no longer makes a difference. Hear it from the horse’s mouth: Matt Cutts from Google.
LikeLike
I am actually delighted to read this website posts which contains tons of valuable facts, thanks
for providing these information.
LikeLike
Thanks a lot! For this most information
LikeLike