
I’m seriously rubbish at drawing and painting, but who needs arty fingers when you can whip up your own AI to make fine art for you?
Back in 2010, when The Looking Glass Club was published, my then-agent had complained that the technology in 2035 seemed too advanced for just a few decades hence, but despite justifying this with The Singularity, even I’m surprised by just how much AI has advanced in the five years since. I gave a talk about AI at Imperial a few months ago, and demo-ed how Deep Neural Networks are starting to get scarily good at things that, until now, have remained firmly in the realm of human capability, like learning to play Breakout better than you without knowing anything about the game beforehand, and imagining trippy works of art.
Yesterday, I came across @DeepForger (a Twitter bot by @alexjc) that paints impressionistic versions of your photos by copying the style and techniques of famous artists. How’s that for living in the future? It painted this amazing portrait of me in the style of Picasso:

Okay, it’s not quite Picasso, but it’s really quite remarkable. It’s understood the stylistic essence of the art piece it was given and created something in a similar vein!
This extraordinary AI is an implementation of a neural art algorithm that was only published at the end of August!
Unsurprisingly @DeepForger has a long queue of commissions so I decided to have a go at creating my own AI Artist that I could whip into making art at will. If you want to do the same, here’s how I did it, and what I learned in the process, so that hopefully you can avoid some of the mis-steps I took.
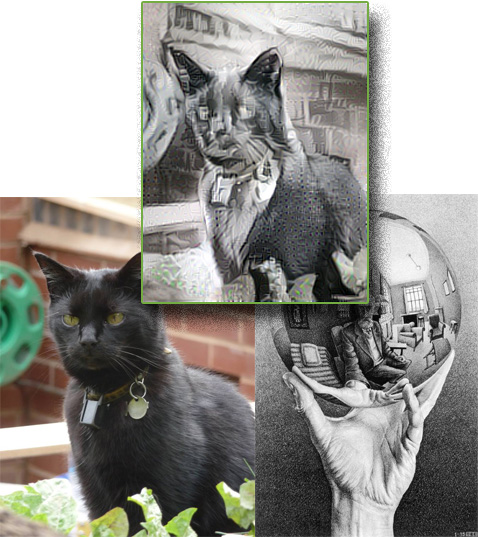
I’m working on a setup that can handle bigger files as I write this, but here’s an Escher-inspired memorial of mum’s cat Misty, who sadly passed away a few days ago:
How to create an instance of “Neural-Style” on an Ubuntu VM
Neural-style is one of several implementations of Leon Gatys et al‘s neural art algorithm on github. If you know what you’re doing, and already have an Ubuntu server or VM, that link should be enough to get you started.
I’ve been experimenting with three different setup flavours:
- An Ubuntu VM running on VirtualBox on my laptop
- A more powerful Ubuntu VM created as a droplet on DigitalOcean
- An AWS GPU instance
I’ll give detailed steps here for the first two configurations, and you can find steps for setting up an AWS GPU instance nicely documented here. (UPDATE: the AWS+docker implementation caused me too many issues, but I finally got a GPU-accelerated instance up and producing amazing results; I’ll post at the end) First though, here are some important things that can save you some pain and why I tried all three:
Learnings/Gotchas – read these first!
The two main causes of pain were lack of memory and directory permissions.
Neural-style needs at least 4GB of RAM on the Ubuntu instance if you use the default settings. You can easily brick your VM if you don’t have enough (VirtualBox hangs and goes into Guru Meditation mode you have to start over). It has a mode which only needs 1GB RAM but it doesn’t give good results AFAICT.
You can get it to work with less RAM by setting the image_size switch to either 256 or 128 pixels (default is 512) but then the images are too small to be good.
If you’re using VirtualBox you can probably give the VM about 45% of the host RAM safely – more than this and you’ll run into trouble. This is why I ended up trying DigitalOcean and AWS although I did get eventually get a version working on my laptop too.
If you use Vagrant to set up your VM then make sure you run all the commands using sudo to avoid permission errors which can be arcane and hard to figure out.
The default mode of neural-style is optimised to use a GPU but there’s a switch to force CPU.
I found that VMs with lots of cores (whether CPU or GPUs) didn’t make the code run any faster so there’s no point renting a cloud VM with loads (e.g. AWS g2.2xlarge is enough). GPUs run the code substantially than CPUs though (because matrix ops are done directly on the chip).
Setting up a VM on DigitalOcean is far simpler than AWS but they don’t have a GPU virtualisation so they are quite slow, no matter how many CPUs you go for.
Step 1 – Spin up a fresh Ubuntu VM
If you use Vagrant and VirtualBox:
- On your host create a new directory for your project and then in powershell or cmd run
vagrant init ubuntu/trusty64 vagrant up- You can either increase the memory before step 2, using the Virtual Manager, or poweroff and do it after checking your VM works.
Alternatively, if your home machine isn’t powerful enough, you can use DigitalOcean to create a cloud VM. Just create a new droplet with at least 4GB (preferably 8GB) based on Ubuntu 14.04 and SSH in. (Remember to use sudo for everything, if you’re not root which you won’t be in a VirtualBox machine.)
Then, follow these commented steps in turn to configure your VM (you have run each step separately, this isn’t a script but if anyone fancies knocking up a Chef recipe to do this, do share!)
# you'll need git
sudo apt-get install git

# 1. install lua package manager
sudo apt-get install luarocks

# 2. install lua just-in-time compiler
sudo apt-get install luajit

# 3. install torch - a scientific computing framework for luajit
curl -s https://raw.githubusercontent.com/torch/ezinstall/master/install-all | bash

# 4. protocol buffers - google's data exchange format
sudo apt-get install libprotobuf-dev protobuf-compiler

# 5. install caffe - a deep learning framework
sudo luarocks install loadcaffe

# 6. to handle various image formats
sudo luarocks install image

# 7. a neural network library
sudo luarocks install nn

# 8. and finally, get "neural-style" from github repo
sudo git clone https://github.com/jcjohnson/neural-style.git

# 9. go into the directory you've just cloned
cd neural-style

# 10. Download the neural models that contain the art genius - this step may take a while
sudo sh models/download_models.sh
You’re should be almost ready to make some art. You may also want to set up another shared folder for image resources, but I was lazy and just the vagrant folder on my host which was shared by default and copied stuff in/out of this directory as needed.
You will need a source art image for the style (in fact, you can use more than one but start simple) and a photo that you want to artify.
A headsup
Before you start, here’s what to expect if everything runs smoothly: we’ll use a verbose flag (-print_iter 1) so you should see steps as they happen, if things go quiet for more than 30s or so then check the state of your VM using Vbox manager to make sure it’s alive – if not, it’s probably run out of memory.
When neural-style is running, it starts by creating convolution layers which you’ll see in the output, and then after a few more steps, it should start producing image iterations. You need between 1,000 and 2,000 iterations for a good image. If you don’t see output like this with iterations every few seconds then something has gone wrong:
conv1_1: 64 3 3 3
conv1_2: 64 64 3 3
conv2_1: 128 64 3 3
conv2_2: 128 128 3 3
conv3_1: 256 128 3 3
conv3_2: 256 256 3 3
conv3_3: 256 256 3 3
conv3_4: 256 256 3 3
conv4_1: 512 256 3 3
conv4_2: 512 512 3 3
conv4_3: 512 512 3 3
conv4_4: 512 512 3 3
conv5_1: 512 512 3 3
conv5_2: 512 512 3 3
conv5_3: 512 512 3 3
conv5_4: 512 512 3 3
fc6: 1 1 25088 4096
fc7: 1 1 4096 4096
fc8: 1 1 4096 1000
Setting up style layer          2       :       relu1_1
Setting up style layer          7       :       relu2_1
Setting up style layer          12      :       relu3_1
Setting up style layer          21      :       relu4_1
Setting up content layer        23      :       relu4_2
Setting up style layer          30      :       relu5_1
WARNING: Skipping content loss
Running optimization with L-BFGS
Iteration 1 / 1000
  Content 1 loss: 2094767.343750
  Style 1 loss: 26350.109863
  Style 2 loss: 4467230.468750
  Style 3 loss: 1869238.085938
  Style 4 loss: 90886093.750000
  Style 5 loss: 12086.410522
  Total loss: 99355766.168823
   creating recyclable direction/step/history buffers
Iteration 2 / 1000
  Content 1 loss: 2094763.906250
  Style 1 loss: 26350.109863
  Style 2 loss: 4467230.468750
  Style 3 loss: 1869238.085938
  Style 4 loss: 90886087.500000
  Style 5 loss: 12086.410522
  Total loss: 99355756.481323
Finally: let’s make make some AI art!
If you want to do a small test run with safe options, try this (replacing the two image filenames with your real files):
# small fast images
sudo th neural_style.lua -style_image ORIGINALARTISTIMAGE.jpg -content_image YOURPHOTO.jpg -gpu -1 -image_size 128 -print_iter 1
If that works, then you can try something larger:
# default image size is 512 anyway, takes more memory the larger the file
sudo th neural_style.lua -style_image ORIGINALARTISTIMAGE.jpg -content_image YOURPHOTO.jpg -gpu -1 -image_size 512 -print_iter 1
If you absolutely have to work with less than 3GB available then you can change the optimiser but to get good results you’ll need to experiment A LOT more, and normalising gradients is recommended:
sudo th neural_style.lua -style_image ORIGINALARTISTIMAGE.jpg -content_image YOURPHOTO.jpg -gpu -1 -image_size 512 -print_iter 1 -optimizer adam -normalize_gradients
UPDATE – AWS GPU-accelerated version with CUDA:
Docker seemed to complicate everything for me, so I went back and unpicked the dependences so I could you the plain install with AWS.
Here are the modified steps:
# follow these steps for AWS/GPU
# http://tleyden.github.io/blog/2015/11/22/cuda-7-dot-5-on-aws-gpu-instance-running-ubuntu-14-dot-04/

# then follow ONLY the mount GPU steps here (not the docker stuff)
# http://tleyden.github.io/blog/2015/11/22/running-neural-style-on-an-aws-gpu-instance/
# and then the steps later marked optional

# you'll need git
sudo apt-get install git

# install lua package manager
sudo apt-get install luarocks

# install lua just-in-time compiler
sudo apt-get install luajit

# install torch - a scientific computing framework for luajit
# (takes quite a while!)
curl -s https://raw.githubusercontent.com/torch/ezinstall/master/install-all | bash

# protocol buffers - google's data exchange format
sudo apt-get install libprotobuf-dev protobuf-compiler

# install caffe - a deep learning framework
sudo luarocks install loadcaffe

# to handle various image formats
sudo luarocks install image

# a neural network library
sudo luarocks install nn

# and finally, get "neural-style" from github repo
sudo git clone https://github.com/jcjohnson/neural-style.git

# (optional for GPU/AWS) install cutorch - a CUDA backend for torch
# see https://en.wikipedia.org/wiki/CUDA
sudo luarocks install cutorch
sudo luarocks install cunn

cd neural-style

sudo sh models/download_models.sh

# you may need SFTP set up too - I assume you can work that out

# now you can paint FAST!
sudo th neural_style.lua -style_image style.jpg -content_image subject.jpg -print_iter 1
And this is the first result I got! Stunning!

And a much better Escher-cat:

Have fun! And share your art!
Gruff

Erratum: replace “curl -s https://raw.githubusercontent.com/torch/ezinstall/master/install-all | bash”
by
“curl -s https://raw.githubusercontent.com/torch/ezinstall/master/install-all | sudo bash”
LikeLike
you may also want to do an “apt-get update” before beginning, especially with DigitalOcean
LikeLike
I ran into the ram issue with Vagrant/vbox as my physical ram is capped at 2GB.
Setting up a swapfile seems to have fixed it … so far. TF builds and runs smoothly.
# IF tensorflow build fails, create a virtual swapfile.
sudo dd if=/dev/zero of=swapfile bs=1M count=4000
sudo mkswap swapfile
sudo swapon swapfile
echo “/swapfile none swap sw 0 0” | sudo tee -a /etc/fstab
LikeLike